 Menu
Menu
Easy Automated Builds - Part 2
Filed under: #daxmusings #bizapps
In Part 1 we looked at installing the TFS custom activities into the source tree, telling the build controller where to find the DLLs. Finally we also made sure Visual Studio can find our DLL files so we can edit workflows.
One of the major updates between TFS 2012 and TFS 2013 is the default workflow. One, it is stored differently. And two, the 2013 workflow has been simplified to basically a one-page workflow (TFS 2012 has pages and pages of collapsible workflow steps). To account for both, let me start with showing you where to edit the workflow. Again, 2013 is super-easy. I like to start with the bad news first, so let’s start with TFS 2012.
Also, before you continue make sure you have the custom activities DLLs available for Visual Studio, as explained in Part 1.
In TFS 2012, open your source control explorer and find the project you are building for. Each project will have a folder called “BuildProcessTemplates”. You will find a few workflows in there, including a “DefaultTemplate” with some version number appended to it. Double-click the Default Template XAML to open it. Once it’s open, from the File menu select SAVE AS and create your own name, such as AXBUILD.xaml or something more creative. Now, I’ve seen regular issues with Visual Studio giving errors on even the default workflow file. If you see any warning icons (red or yellow triangles with an exclamation point) or if you see any bright red error messages inside the workflow - just close and re-open the XAML file. I’m not sure if that is just my system, but regularly I have to open a workflow twice to make it load all perfectly.
Now that you’ve loaded the XAML file, you’ll notice how large it is. To find the spot we need to change (ie, where Visual Studio projects are being compiled), click the “Collapse All” link at the top right.
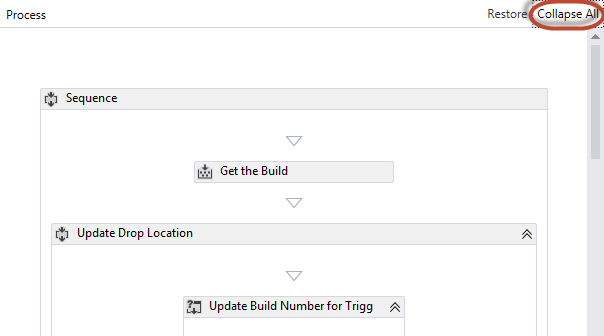
Now, one by one, open the nodes I’ll list out by clicking on the arrows.
Open the following nodes, one inside the other:
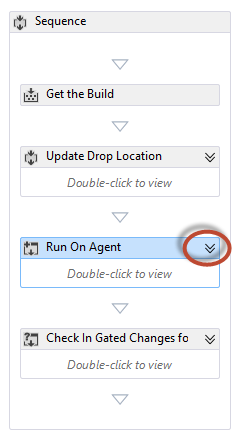
- Run On Agent
- Try Compile, Test, and Associate Changesets and Work Items
- Sequence
- Compile, Test, and Associate Changesets and Work Items
- Try Compile and Test
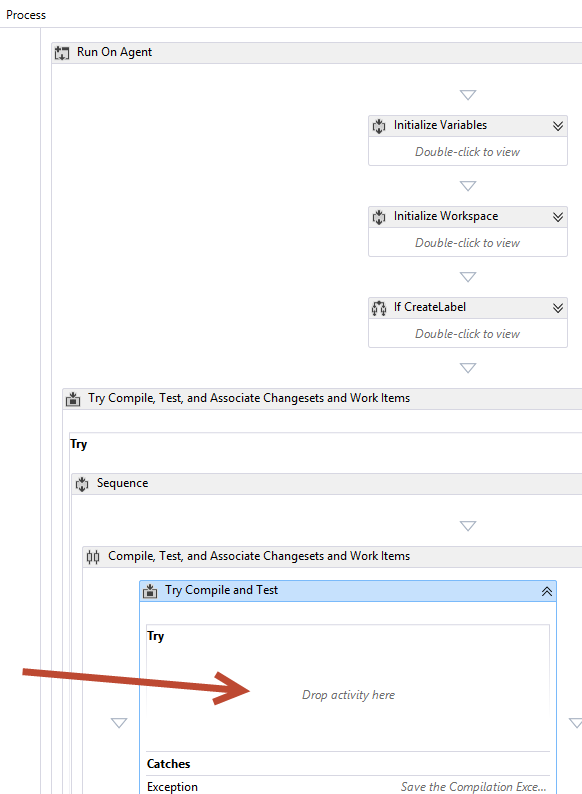
You could go down deeper and keep the testing piece in. This would allow you to actually make a generic Visual Studio test project part of your build, which can call into AX unit testing, as explained here. For the sake of simplicity here, I’ll stick to interjecting here (you’d need to go down a few more levels). At this point, you can delete the “Compile and Test” node entirely (leave the encompassing “Try Compile and Test”). This is the place where we will add our own Dynamics AX build workflow, inside the try compile and test. Note that the way the workflow is set up prior to where we stepped in, you will still need a solution file (.sln) for the build to work. You can just create a blank solution (without projects!) and add that into the source tree along side your code. In fact, just opening the XAML file without a project in Visual Studio will create a blank solution because VS needs context. If you look at your solution explorer you’ll notice VS has created a blank solution (probably “Solution1” or something) without any projects in it. You can just save that solution (give it a proper name) and put that in your source control tree. We’ll need it later when we setup a build definition.
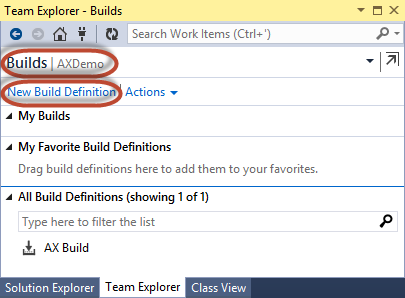
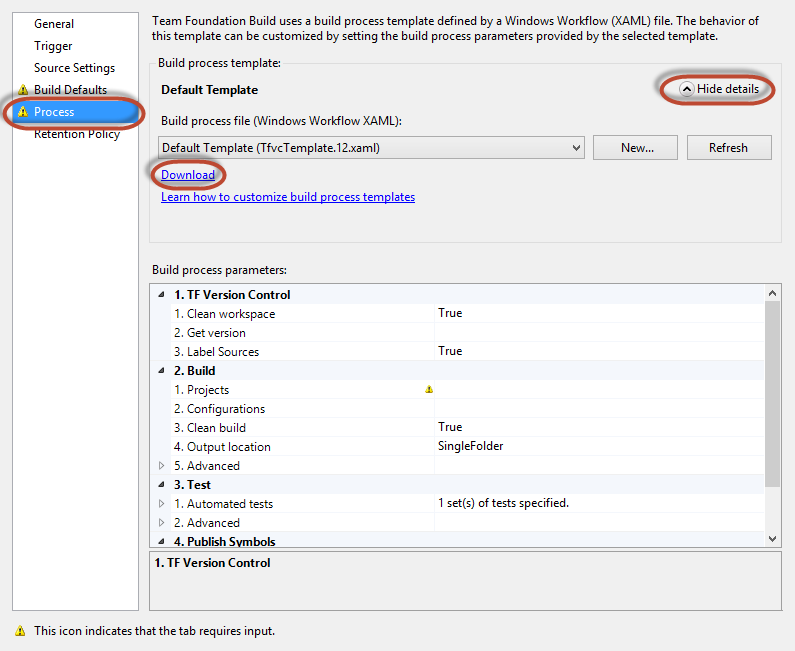
In TFS 2013, the story is different. For starters, each project no longer has XAML workflows copied into it when you create it. There are default templates still, but they are stored on the server somewhere and not copied down to the project level. So, to customize a default template, we first need to grab it. To do this, we first need to start a new build definition, and we can download the default template from there. You need to get to “Builds”, and click the “New build definition” link. Technically you can work from any version of VS to connect to any version of TFS - however I was unable to grab the default template for TFS 2013 from any other version but VS 2013. If anyone knows how, please put it in the comments!
When you’re on the new build definition screen, go to the “Process” tab and click the “Show details” arrow. In the details you can click “Download”. Close the new build definition and don’t save it, we’ll come back to this later.
Now, open the XAML file you just downloaded. If you get any sort of error, close it and open it again. As I explained in the TFS 2012 section above, I’ve seen some interesting issues the first time you open a XAML file. Loading it a second time seems to load all dependencies correctly. Now, this workflow is a lot more condensed than the TFS 2012 one. What we are really looking for is the “Run on agent” > “Try” > “Compile, Test and Publish” section.
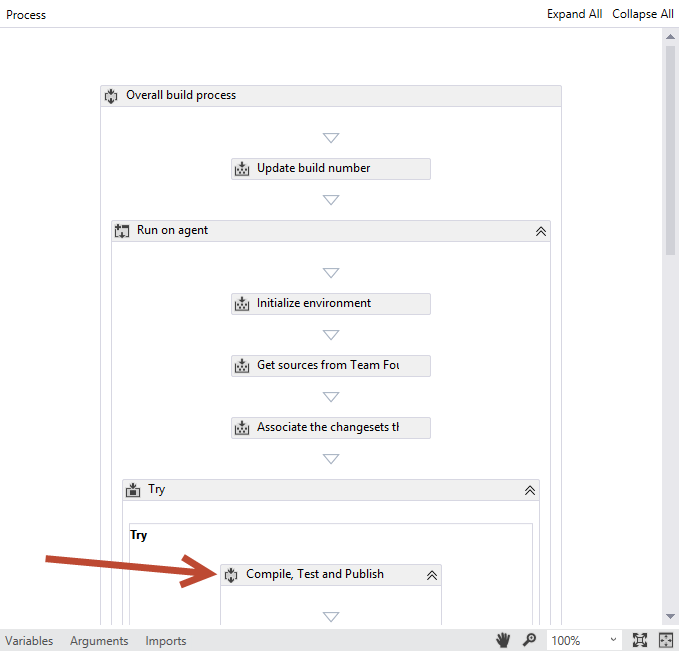
As with the TFS 2012 build, you can delete the whole Compile, Test and Publish structure and we can insert it there. If you want to include test projects (again, see TFS 2012 explanation above) you can drill down into this sequence and remove the msbuild compile steps with our Dynamics AX scripts, and leave the testing in. So, now you have another blank slate to start building our Dynamics AX build workflow!
Ready for Part 3, build a workflow!
There is no comment section here, but I would love to hear your thoughts! Get in touch!
Blog Links

Blog Post Collections
- The LLM Blogs
- Dynamics 365 (AX7) Dev Resources
- Dynamics AX 2012 Dev Resources
- Dynamics AX 2012 ALM/TFS
Recent Posts
-
From Text Prediction to Action
Read more... -
The Killer App
Read more... -
The AI Software Pipeline
Read more... -
The Software In Charge of AI
Read more... -
From Text Predictor to Chatbot
Read more...